Red Hat Bare Metal Backup with Relax and Recover (ReaR)
 Bare Metal Backup on Linux has always been a challenge. Initially an administrator may attempt some combination of dump or tar to create a reproduction of a running machine. While this captures the data, it won’t create a true bare metal backup that could be used to recover a system from scratch.
A solid bare metal backup on Linux requires the following three components:
- A bootable ISO with the all the required drivers and kernel modules
- An ability to re-create the partitions and filesystem layouts
- A restorable copy of the data
Quietly, almost without notice the open-source project ReaR has emerged to address exactly these requirements. And to sweeten the pot, the project is created entirely in bash. Simple, extendible and written in the lingua franca of all Linux systems on the planet – what more could an admin hope for.
You may not have heard of ReaR, but Red Hat, SUSE and Ubuntu all officially support this project in the mainline documentation trees:
SUSE: https://www.suse.com/documentation/sle-ha-12/book_sleha/data/cha_ha_rear.html
Ubuntu: http://manpages.ubuntu.com/manpages/zesty/man8/rear.8.html
Quick intro to terminology
The official project is called Relax-and-Recover. They’ve developed some terminology that you need to know when reading through the docs.
The first term is ‘Workflows’. Workflows are a sequence of steps the application will execute when either creating the image backup or performing the restore. Each of these steps is a discrete bash script stored in /usr/share/rear/. We’ll discuss how to know precisely which scripts are run in a moment.
The second term is ‘Layouts’. Layouts are a reference to the disk partitions and filesystem layouts associate with an image backup. This part of the project is quiet clever and captures logical volume definitions (LVM), software raid setups, encrypted volumes and even multi-path disks for those systems using SAN networks.
The third term is ‘Rescue System’. The project uses this term to refer to the bootable recovery disc. The Rescue system is the collection of drivers and kernel modules plus bootloader needed to boot a working Linux image. The driver and modules are those discovered when creating the image and the bootloader defaults to syslinux. The Rescue System is stored as an ISO file, but there are options for other bootable media.
The fourth term is the ‘Backup System’. The project uses this term to refer to the data backup. The two most common backup formats are either a tarball of all the data or file & folder backup using rsync. If you use the default tarball option, the tarball is gzipped to save space.
The final two terms are OUTPUT and BACKUP. They are sprinkled everywhere in the documentation. OUTPUT refers to the rescue media eg: the ISO. The term BACKUP refers to the data backup.
Get Ready to Image Backup
To create an Image Backup, you need to have someplace to store the image. Specifically, the image target needs to be to a volume that is not one being imaged. You will either need a separate internal hard drive, a USB external drive or a suitably large network target to receive the entire image backup – big enough to hold the ISO plus the data backup.
One other perhaps not so obvious point – the restore process will need access to the data during recovery. For example, if you choose to store your image on the network, the backup process will record the network location and credentials used to create the backup. The restore process will by default use the same location and credentials when you initiate a restore. There are options to adapt this if need be.
You’ll also want to download and install the latest version of ReaR. I recommend going right to the source rather than relying on your local platform’s package management for installation. The simplest technique is to pull from github:
# git clone https://github.com/rear/rear

# cd rear && make install
Our Setup: Backup to a Windows Server
There are tons of storage options available. You can create and save backups to an NFS Server, an FTP Server (and FTPS and SFTP), and an Rsync Server to name just a few. We’re going to choose the CIFS option, partially because it demonstrates a slightly more complicated setup but also because it was the one we had readily available when creating the article.
ReaR stores its configuration options in /etc/rear/local.conf. Here’s the one we used:
# cat > /etc/rear/local.conf <<EOF

OUTPUT=ISO

BACKUP=NETFS

BACKUP_URL=cifs://{WINDOWS-IP-ADDRESS}/{WINDOWS-SHARE}

BACKUP_OPTIONS=”cred=/etc/rear/creds,vers=2.1”

EOF
For cifs storage, it’s recommended to store your credentials in a separate file /etc/rear/creds:
# cat > /etc/rear/creds <<EOF

username=recover

password={SECRET-PASSOWRD}

EOF
In the two scripts above, replace {WINDOWS-IP-ADDRESS} with the ip-address of your windows server. Replace {WINDOWS-SHARE} with an actual share on the windows file server. And replace {SECRET-PASSWORD} with the clear text version of the password with read/write share privileges. This example assumes the account name is on the windows server is ‘recover’.
TIP: Try not to get too frisky with whitespace in your configuration files. These configuration files are sourced like bash scripts so avoid any extraneous whitespace around the assignment operator.
First Image Backup
The command to create a backup is:
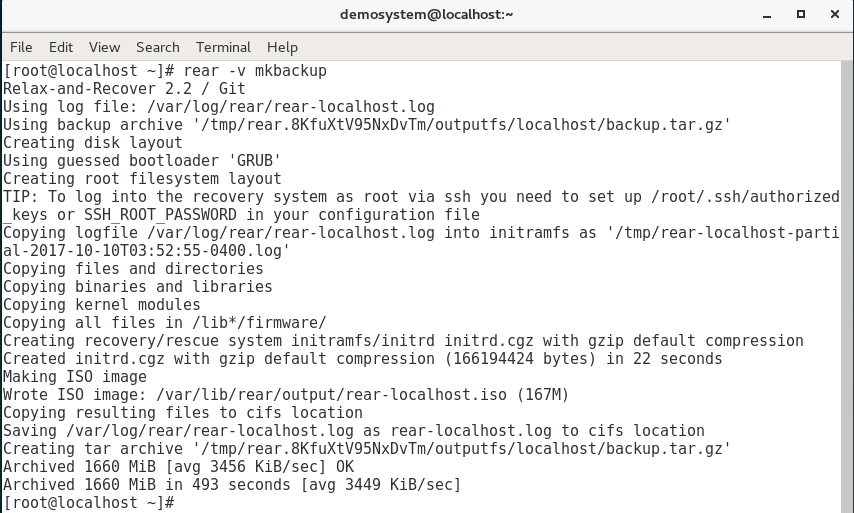
# rear –v mkbackup
This will create a rescue media and a data backup. The ‘-v’ causes a reasonable amount of output to directed to the console. If you leave it off, the operation will be completely silent and only report errors.
Here’s the typical output from mkbackup.
If the rear process encounters an error, it will record it in the log /var/log/rear/rear-{HOSTNAME}.log, where {HOSTNAME} will be replaced with your hostname.
It’s quite common the first time you run mkbackup, you’ll encounter a series of errors related to missing dependencies. It may take a few tries of iteratively installing required dependencies using your package management and re-running mkbackup. Stick with it – it goes quick.
Recover an Image
To recover a system using the image, you’ll need to transfer the ISO to a recovery device you can boot. Let’s assume for a moment you burn the ISO to a CD and that you’ve booted it. You’ll be presented with the following syslinux screen.
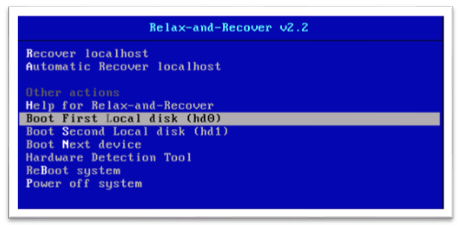
To recover you system, we recommend you choose option 1 – Recover localhost. At the login prompt, type ‘root’ and which point you will be automatically logged in.
The command to initiate recovery is:
# rear recover
The recover system will guide you through a series of prompts to recreate the source image onto the target. That’s all there is to it.
Test, Test, Test
A good image backup is only as good as its ability to recover. Believing its good is not enough – you’ve got to test your recovery.
There are several ways to test your recovery. First, if you own duplicate hardware, you should use it to perform a complete restore. A successful recovery to this equipment will confirm it’s a suitable machine to use in the event of disaster.
If you don’t own completely duplicate hardware, another good option is to use a virtualized environment. A good choice here is VirtualBox from Oracle. This system has the ability to mount the ISO you created and emulate most standard x86, x64 environments.
The act of performing testing is going to also act as training for how to actually recover a system when you’re facing a disaster. It’s a good idea to makes notes on what you needed todo. Having a record of what you did can be an invaluable tool during periods of crisis. You’ll be glad you did.
Advanced Options
The open source developers maintaining ReaR are clearly black-belt, ninja bash coding warriors. The code is a perfect example of how bash scripts should be written, with each sequence of steps broken into discrete modules that are perfectly documented. Its a marvel of elegance to behold.
If you are trying get familiar with ReaR and want to see the sequence of steps (eg: the workflow), but to not actually perform the steps, use the ‘-s’ simulation mode with the ‘-S’ to activate step-by-step mode which displays the name of the scripts it plans to run:
# rear –s -S mkbackup
You can familiarize yourself with the ReaR system by reading a single file /usr/share/rear/conf/default.conf. This file is the centralized collection of all settings and is the central documentation point. It’s recommend you add your overrides to /etc/read/local.conf
The command to see the complete list of active settings for your system is:
# rear dump
There are a few variables that are worth discussing here
BACKUP_PROG_EXCLUDE – This setting allows you to exclude files and folders from the backup. This is particularly useful to exclude files and folders that may have large amounts of storable that you are already backing up via some other mechanism (say backup to tape). The variable is expected to be a bash array variable and is typically populated with:
BACKUP_PROG_EXCLUDE=( '/tmp/*' '/dev/shm/*' "$VAR_DIR/output/*" )
If you’d like to exclude additional files or folders, the entry in your /etc/rear/local.conf would look like:
BACKUP_PROG_EXCLUDE=( "${BACKUP_PROG_EXCLUDE[@]}" '/this/*' '/that/*' )
CLONE_ALL_USERS_GROUPS – This setting controls whether users and groups are cloned into the restore system. It’s recommended you set this to ‘yes’ to ensure the correct ownership rights are set when recovering a system.
CLONE_ALL_USERS_GROUPS=”yes”
SSH_ROOT_PASSWORD – This setting defines a password for remote access to the recovery system as ‘root’ via SSH. This password is valid only while the recovery is running and will not be restored onto the target recovered system. The password must be provided in hashed MD5 format.
You can generate a hashed password with the following command
# echo "my_rescue_root_password" | openssl passwd -1 –stdin
Copy paste the output to the variable SSH_ROOT_PASSWORD=’…’.
Keep in mind, it could be months or even years later when you want to use this password, so it’s important you keep a record of the password someplace safe.
Closing
Rear is a great tool to build your Red Hat Bare Metal Backup. You can read the full documentation online at http://relax-and-recover.org/
Carroll-Net was founded in 1994 with the singular goal of providing datacenter services our clients require at a price they can afford, delivered everywhere they need them. The industry now calls this cloud services — we call it common sense.
You might like some of our other articles…
 Red Hat Dynamic Routing |  Red Hat Traffic Shaping |  Image vs. File Backups | Tools for Tracking Hackers |