RIP Routing with RHEL
As a network becomes more complex the need to distribute routing information automatically becomes apparent. Without automation, anytime a router or Internet connection fails, engineers need to visit an ever increasing number of devices in the network to manually adjust routing tables. This might be acceptable with a small network, but quickly becomes overwhelming as the network grows.
The solution to this challenge is to deploy a dynamic routing protocol that will automatically distribute routing information to all devices in the network. There are several candidates, but we are going to focus on the Routing Internet Protocol (“RIP”). RIP can detect outages to the network and automatically broadcast change information to network neighbors to adapt to the outages, thereby eliminating the need for any manual adjustments.
Routing Internet Protocol (RIP)
The Routing Internet Protocol is one of the oldest routing protocols still in use today. It’s roots go back to the late 1960’s when the networking ancestors of the Internet, ARPANET and CYCLADES were first formed. RIP is still widely used and is experiencing a resurgence in interest due to the fact RIP is the only routing protocol available on Windows.
RIP has several advantages over newer more sophisticated protocols. First, because of its age, RIP’s operational behavior is well understood. It’s successfully been deployed into thousands of networks and is extremely reliable. The second advantage to RIP is its simplicity. RIP can be configured typically with just a handful of settings.
Our Network Lab
Here is the network we will create.
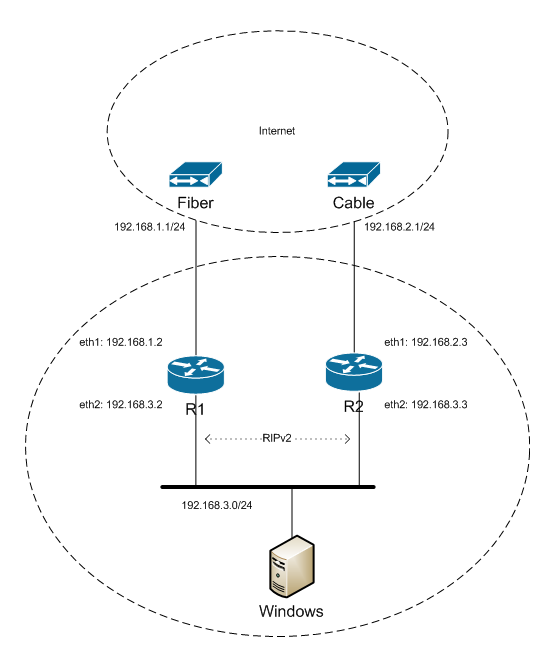
R1 and R2 are both assumed to be Redhat routers running RHEL version 7.x. Although we’ve selected Redhat, the techniques described will work equally well on any modern version of Linux, Unix and BSD.
We are also going to deploy a Windows 2012 server into our Network Lab, and configure this server to run RIP as well. It will receive its routing information automatically from R1 and R2 and automatically use the routing information we choose to distribute.
We will build the lab using RIP version 2.
Network Lab Goals
We’d like to accomplish several goals in our network. First we’d like to configure the network to prefer our Fiber Internet connected to R1 over the Cable line connected to R2. So long as the Fiber line is up an operational, it should be the preferred Internet connection.
Which brings us to our second goal – when the Fiber line goes down, we want to automatically switch over to the cable line. This goal implies we need technology to know when the line is down and to initiate the process of switching.
While RIP has no mechanism to troubleshoot Internet lines, we’ll develop a simple system that runs on our Redhat routers to detect an outage and relay this outage into RIP. We rely on RIP communicating these changes through the network which will cause the network to automatically switch over to the Cable line.
Installing RIP Software
Redhat does not provide its own routing software. To use RIP we’ll install Quagga which provides all the tools we require. The instructions to install Quagga on Redhat are http://carroll.net/blog/quagga-on-redhat.
To use RIP on Windows 2012 or Windows 2016, we’ll need to install the optional Routing & Remote Access module from Microsoft. The instructions on how to install RIP on Windows are http://carroll.net/blog/rip-routing-on-windows/
Configure Redhat Routers
Before we go any further there is a critical concept to keep in mind. Quagga does not ROUTE packets. Actual packet routing is the business of a host’s ip protocol stack; i.e., the Redhat kernel in our case. Quagga is in the business of deciding how to manipulate the routing tables used by Redhat.
To put it another way, Quagga makes routing changes the same way you would– by installing or removing routes from the host’s routing table. If you want to see how a packet would route from a host, you can directly inspect the hosts routing table. On Redhat, the command is ip route
Quagga’s operation is divided into individual daemons, with each daemon managing a separate routing protocol. The RIP daemon is ripd/etc/quagga/ripd.confzebrazebra/etc/quagga/zebra.conf
R1 Quagga Configuration
The R1 router configuration files are:
# cat /etc/quagga/zebra.conf
hostname R1
ip route 0.0.0.0/0 192.168.1.1
ip route 8.8.8.8/32 192.168.1.1
Line 1 provides the name of the host. It is primarily for documentation purposes and provides no active role in the operation of Quagga.
Line 2 is the default route. It adds what Quagga considers a static route to the system (we’ll discuss the types of Quagga routes shortly). What’s important to understand is this should be the only place in your Redhat configuration that specifies the default route. Make sure you do NOT have a static route hard-coded in your /etc/sysconfig/network-scripts/
Line 3 is a route to an Internet host that we wish to insure always routes over our default gateway, even if we later remove our default route. This will be used as our ‘testing host’ in the internet outage detection script we develop later in this article.
# cat /etc/quagga/ripd.conf
router rip
    version 2
    network LAN
    redistribute connected
    redistribute static
One thing to be aware of in the RIPD configuration file is indentation. Quagga considers indented lines to be configuration details related to the most recent un-indented line. In our case, the configuration settings are all related to the router rip statement.
Line 1 – Identifies the Quagga routing protocol being configured, which in this case is RIP.
Line 2 – Configures the RIP daemon to only speak version 2. This statement disables support for the older version 1 and is considered a best practice by the RIP routing community.
Line 3 – Identifies the network interface over which we plan to “speak” the RIP protocol. By default, Quagga will listen and learn routes passively, but only actively share routes with neighbors when you include the network statement. LAN
Line 4 – Configures the RIPD daemon to distributed connected routes which is enabled by default. This statement is here to clarify this fact. We’ll explain connected routes in a moment.
Line 5 – Configures the RIPD daemon to distribute static routes.
At this point, you can start zebra and ripd using the following commands on R1
	# systemctl start zebra
	# systemctl start ripd
We now have a fully functioning router that will provide automatic RIP route updates to neighbors on the LAN network. If we were to add a Windows Server and configure it with RIP, it would automatically learn the default route to the Internet. If you’d like to try this, see the page http://carroll.net/blog/rip-routing-on-windows/.
Before we dive into R2 configuration, we need to take a moment and explore the concept of Route Selection in Quagga.
Route Selection
Route Selection describes how Quagga selects or discards routes when deciding how to update a hosts routing table. The first principle to keep in mind is that routing decisions are always based on prefix length. This is standard for all ip-routing technology and is no different for Quagga.
Prefix length refers to the number of bits in a route used to represent the network component. For example, 1.x.x.x/24 uses 24-bits. Whereas 1.x.x.x/30 uses 30-bits. If Quagga were to consider these two routes it would select the /30 routes because it is more specific (eg: the prefix is longer) than the /24 network which is shorter.
When two routes have the same prefix-length, the route selection process in Quagga then considers the Administrative Distance of the route. There are different types of routes and each comes with a default distance. This is a setting that you can manipulate hence why it’s referred to as administrative. When considering Administrative Distance, the route with the lowest distance is selected. Routes learned from RIP have a default Administrative Distance of 120.
The final attribute considered when making routing decisions is the route metric. Each routing protocol has the ability to set metrics and usually does so in a way that reflects its’ idea about the route’s distance or quality. In the case of RIP, the metric is the number of hops a packet would need to pass through before arriving at its’ final destination.
Route selection is a decision making hierarchy that stops when it finds “the best”. It only moves to the next step in the hierarchy if two or more routes match. The route selection hierarchy is:
- 1. Pick the route with the longest Prefix Length
- 2. Pick the route with the lowest Administrative Distance
- 3. Pick the route with the lowest Metric
Types of Quagga Routes
Quagga understands four types of routes that are determined based on how it learned them. They are; kernel routes, connected routes, static routes and dynamic routes. Each route type comes with a default administrative distance. The defaults are:
| Kernel Routes | Most reliable; cannot be overriden |
| Static | 0 |
| Connected | 1 |
| RIP Routes | 120 |
Kernel routes are those created on your host outside of the Quagga system. You manually create these routes using your local Redhat route statements; e.g., ip route add …/etc/sysconfig/network-scripts
Connected routes are those learned by Quagga inspecting how a host is connected to a network. They are typically the routes used to reach local networks to which a host is directly connected. Because they are expected to be physically connected to a host, they are considered very reliable routes and good candidates for sharing with other routers in a network.
Static routes are all those configured directly within Quagga. Routes added to Quagga will be installed in the host and be used to route packets. Quagga will remember that it is the owner of these routes and remove them when the Quagga system is stopped.
The fourth route type, dynamic routes, are those learned from other routers over a routing protocol. Routes learned over a routing protocol are always redistributed to neighbors configured to use the same protocol.
Route Redistribution
Now that we’ve discussed route types, we can return to the R1 configuration. You can see in the /etc/quagga/ripd.confredistribute
The redistribute
One piece of advice we’d offer – you should never configure Quagga to share Kernel routes. Kernel routes are the best tool an administrator has for manipulating a host’s routing table outside of Quagga. Think of it as your last line of defense when trying to force a host to do what you want. If you want to add routes that get shared with neighbors, then do this with static routes from within Quagga. Trust us on this one – avoid distributing kernel routes at all costs.
R2 Quagga Configuration
The R2 router configuration files are:
# cat /etc/quagga/zebra.conf
hostname R2
ip route 0.0.0.0/0 192.168.2.1 121
Line 1 provides the name of the host.
Line 2 is the default route. Notice, the route includes the distance 121 at the end of the line. We’ll return to this shortly.
# cat /etc/quagga/ripd.conf
router rip
    version 2
    network LAN
    redistribute connected
    redistribute static
These configuration lines are identical to those used by R1.
Let’s return the default-route statement in the /etc/quagga/zebra.conf
When Quagga starts, it immediately installs the default route in R2’s routing table. Quagga keeps a record of the admin distance being 121. Shortly thereafter, the ripd
But shortly after ripd
Routing Updates
Here we should take a moment to discuss routing announcements in RIP. The RIP protocol has a simple logic – every 30 seconds, a hosting running RIP sends its’ entire routing table to its network neighbors. The announcements are sent to the multicast address 224.0.0.9, UDP port 520. The only routes excluded from an announcement are those it learned from that network.
What this means is every 30-seconds R1 sends its’ routing table to the LAN network. And every 30-seconds R2 sends its’ routing table to the LAN network. R1 includes its’ default-route in its’ announcement because its a static route. R2 does NOT include its default-route because its own default was overridden by R1. R2 also does not send the default-route it learned from R1 because it learned it from the LAN network and the rules say you never announce back to a network what you learned from the network.
The ripd
If R2 notices that R1 hasn’t sent any announcements for 3-minutes, it removes the default-route it learned from R1 and reverts to using it’s own static route. During it’s next network broadcast, it includes it’s default-route. This causes the network to switch over to R2 as the preferred default-route.
Detect Internet Outage
What we need now is to detect an internet outage on R1 and when detected to remove the static default-route. With this in place, the network will be able to automatically work around network outages. As a matter of fact, it will work so well, we’ll also need to make sure we provide email notifications when we detect an outage, or it may go without notice when we are on the backup line.
We’ve created a very simple piece of automation in the form a bash script. When invoked it tests reachability to a specific internet host and if it receives no response automatically removes our Quagga static default route. The script is suitable to be called from cron every few minutes and will not just detect outages, but detect internet recovery and restore the static default route when service is restored.
Here is the script which we are going to run on R1.
#!/bin/bash
#------------------------------------------------------------------------------
TESTHOST=8.8.8.8
DEFAULTROUTE=192.168.1.1
NOTIFY="sysop@domain.com"
#------------------------------------------------------------------------------

notify() {
    local summary=$1
    local details=$2
    logger cron.alert $summary
    echo "ping responded: $details" | mail "-s$summary" "-r$NOTIFY" $NOTIFY
}

main() {
    # Set $onbackup to 1 if we are on backup

    $(ip route | grep -qE "^default via $DEFAULTROUTE")
    local onbackup=$?

    # Test internet, set $? to 0 if UP. Save ping output in $out

    local out
    out=$(ping -qc5 $TESTHOST 2>&1)

    # Check for transition from down-to-up
    if [ $? -eq 0 ] ; then
        if [ $onbackup -eq 1 ]; then
            $(vtysh -c "conf t" -c "ip route 0.0.0.0/0 $DEFAULTROUTE")
            notify "Internet restored on `hostname`" "$out"
        fi

    # Check for transition from up-to-down
    else
        if [ $onbackup -ne 1 ]; then
            $(vtysh -c "conf t" -c "no ip route 0.0.0.0/0 $DEFAULTROUTE")
            notify "Internet down on `hostname`" "$out"
        fi
    fi
}

main "$@"
The Explanation
Lines 3 through 5 are important constants that need to be customized to match your environment. There are three settings:
- 1. TESTHOST – the ip address of an Internet host to serve as our test-host. The script will ping this host and based on the success or failure of this decide whether the Internet is up or down. It’s important you pick a reliable host or you may suffer from false outages. You could consider something within your ISP’s network or even pick something further away. Be sure to consider the fact you are going to be generating traffic to a machine you don’t own – be sure to discuss this with the owner of the host before you proceed.
- 2. DEFAULTROUTE – the ip address of the default route to use during normal operations (when your primary internet connection is up).
- 3. NOTIFY – the email address of who to notify when your internet connection goes down and when it is restored.
Lines 8 through 13 defines a notify()syslog(8)
Lines 15 through 40 are the body of the automation that detects internet transitions and takes the appropriate actions. This block of code will be invoked each time the script is launched.
Lines 18 through 19 examine the routing table to determine if the host is currently routing through the backup Internet connection. It set’s the $onbackup
Lines 23 through 24 tests the internet connection by invoking ping(8)$?
Lines 27 through 31 watches for the Internet transition from down-to-up.
Line 27 tests if the Internet is now UP.
Line 28 tests if the host is on backup.
Line 29 demonstrates how to reconfigure Quagga from vtysh(1)
Line 30 invokes the notify()
Lines 34 through 39 watches for the internet transition from up to down
Line 34 test is the Internet is down
Line 35 tests if the host is not currently on backup
Line 36 removes the Quagga static default-route. A side-effect of which causes the network to fail over to R2.
Line 37 invokes the notify()
How to use this script
Copy the code into /usr/local/bin/detect-outage.sh
# cat  >  /usr/local/bin/detect-outage.sh
# chmod 0755 /usr/local/bin/detect-outage.sh
Then add the following crontab(5)
*/2 * * * * /usr/local/bin/detect-outage.shSummary
With a handful of configuration settings on two Redhat hosts and a few lines of bash script you’ve deployed a system to automatically adjust to internet outages. And you’ve eliminated an impediment to growing your network in size and complexity without sacrificing efficiency.
Carroll-Net was founded in 1994 with the singular goal of providing datacenter services our clients require at a price they can afford, delivered everywhere they need them. The industry now calls this cloud services — we call it common sense.
You might like some of our other articles…
 Red Hat Bare Metal Backups |  Red Hat Traffic Shaping |  Image vs. File Backups | Tools for Tracking Hackers |